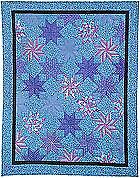
Sapphire Stars Quilt
 SAPPHIRE STARS QUILT

 42 3/4″ x 42 3/4″ – Wall Hanging 62 5/8″ x 79 1/2″ – Fireside Quilt 90″ x 107″ – Queen Size |
Sapphire Stars Quilt by Sharon Hultgren Supplies Note: |
| Fabric | |||
| Wall hanging | Fireside Quilt | Queen Size Quilt | |
| Stars* | 1 yd. | 2 1/4 yds. | 3 3/4 yds. |
| Large Squares | 3/4 yd. | 1 1/4 yds. | 2 yds. |
| Small Squares | 1/3 yd. | 3/4 yd. | 1 1/8 yds. |
| Accent Border | 1/4 yd. | 1/2 yd. | 5/8 yd. |
| Outside Border | 3/4 yd. | 1 1/2 yds. | 3 yds. |
| Binding | 1/2 yd. | 3/4 yd. | 1 yd. |
| Backing | 2 1/2 yds. | 3 2/3 yds. | 8 yds. |
| *Each star requires a 3″ x 44″ piece. | |||
| General Directions Read through instructions before beginning the project. Prewash and press fabric. Use an accurate 1/4″ seam allowance unless noted otherwise. Cutting Directions |
| Wall hanging | Fireside Quilt | Queen Size Quilt | |
| Stars | 4 | 17 | 31 |
| Half Stars | 8 | 14 | 18 |
| Small Squares | 16 | 48 | 80 |
| Large Squares | 5 | 18 | 32 |
| Large Triangles | 4 | 10 | 14 |
Cut 2 (5, 8) 4″ strips for the small squares. Cut as many 4″ squares as given above. Cut 1 (4, 7) 7 1/2″ strip(s) for the large squares. Cut as many 7 1/2″ square as given above. Cut 1 (1, 2) 8 1/2″ strips for the large triangles.  Cut 2 (5, 7) 8 1/2″ squares from these strips. Then cut these squares diagonally. Cut 2 squares 7 1/2″ and then cut them diagonally. These will be the corners. Cut 2 (5, 7) 8 1/2″ squares from these strips. Then cut these squares diagonally. Cut 2 squares 7 1/2″ and then cut them diagonally. These will be the corners.
Quilt Assembly
It is easier to complete rows in sections on the larger quilts. Then join two or three large pieces.
Cut 4 (8, 10) 2″ strips for the contrasting border. Carefully sew this around the quilt. Do not stretch the bias edge on the triangles. Cut 4 (8, 10) 6″ outside border strips. Sew these to the outside of the quilt. Use either mitered or box corners (see below).
Don’t forget to sign and date your quilt! |
 This quilt is “built” diagonally. You begin in the corner. Two half stars are joined by a small square (see illustration at right). The corner can be set on next. Do not stretch the star points.
 The piece must lay flat. Trim the excess from the edges (see illustration at right).
 The next “row” of stars is joined in the same way. Continue joining the “rows” of stars until you reach the opposite corner of the quilt (see illustration at right).
 These rows are then joined by small squares (see illustration at right).
 Now set in the large squares and the side triangles. When setting in the side triangles, mark 7″ from the corner to the narrow point. This is the seam intersection. Do not just sew the triangle in at random. There will be some excess to trim from the edge (see illustration at right).
 When sewing the star points, begin sewing 1/4″ from the wide angle edge and then sew through the point, being careful to maintain the 1/4″ seam.
 Looking at the right side of the fabric, lay the square on top of the star point. Match the top edge and the right side. Stitch to the seam line. Take piece out of the sewing machine. It is almost impossible to pivot this corner well.
 Fold piece, right sides together, as shown at right. The square will be underneath. Stitch to seam line. When clipping threads, leave at least 1″ of thread. Seam will be more secure.
 Press the seam allowance toward the star points. NOTE: When connecting stars together with the small square, repeat this process on the other sides of the square.
 When sewing the large square into the center of the stars, sew side “A” first, then side “D”, side “B” and then side “C”. These seams will begin 1/4″ from the end and finish 1/4″ from the opposite end.
 Layer the quilt top with batting and then the backing. Hand quilt, machine quilt, or tie.